
How to Make Destroyed Jeans at Home: A Step-by-Step DIY Guide
Everybody loves that lived-in, edgy vibe of destroyed jeans—those perfectly torn knees, artfully frayed hems, and sun-bleached streaks that look like a rock concert or a weekend getaway left its mark. But buying designer-distressed denim can cost upwards of $200 per pair. What if you could achieve that same cool, customized aesthetic in your own laundry room for under $20? Distressing jeans at home isn’t just about slashing fabric; it’s an opportunity to express your personal style, upcycle old favorites, and even spark a small side hustle designing for friends or a local boutique.
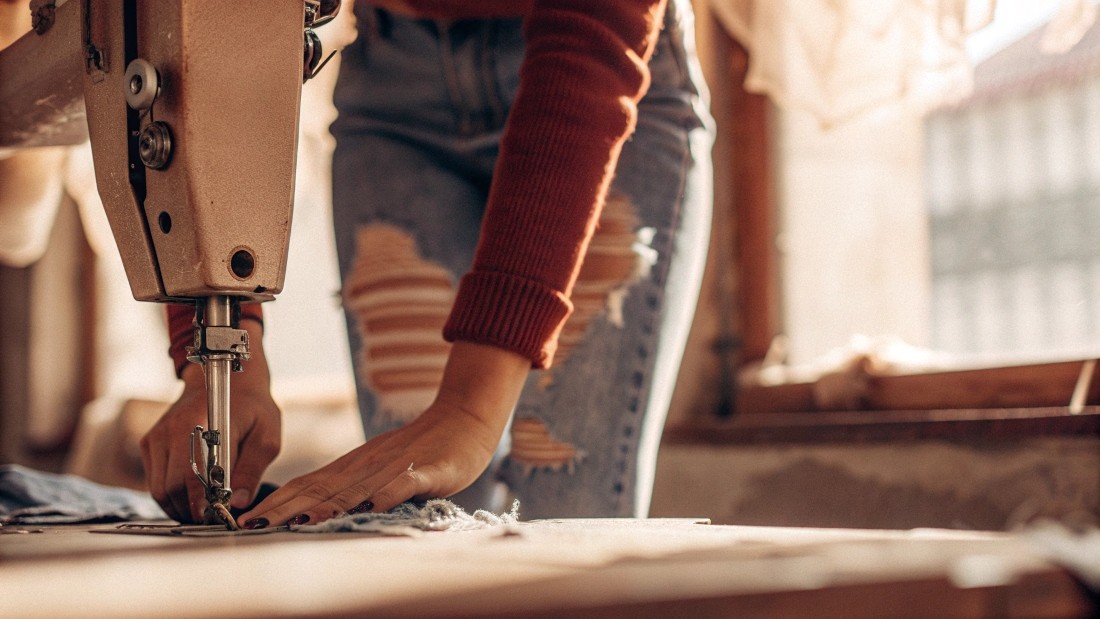
To distress your jeans at home, gather basic tools—scissors, sandpaper, a razor blade, and chalk—then map tear zones with chalk, employ sandpaper or razor techniques to create authentic rips and frays, and reinforce with patches or stitching. Finish by washing gently to set the look. This step-by-step process lets you customize the exact placement, size, and vibe of each hole for a one-of-a-kind pair of destroyed jeans.
Ready to dive in? Picture yourself showing off that custom pair at your next festival or weekend brunch. Keep reading to discover the exact tools, techniques, and creative hacks that will turn your old denim into a fashion statement everyone will envy.
What Tools and Materials Do You Need to Distress Your Jeans?
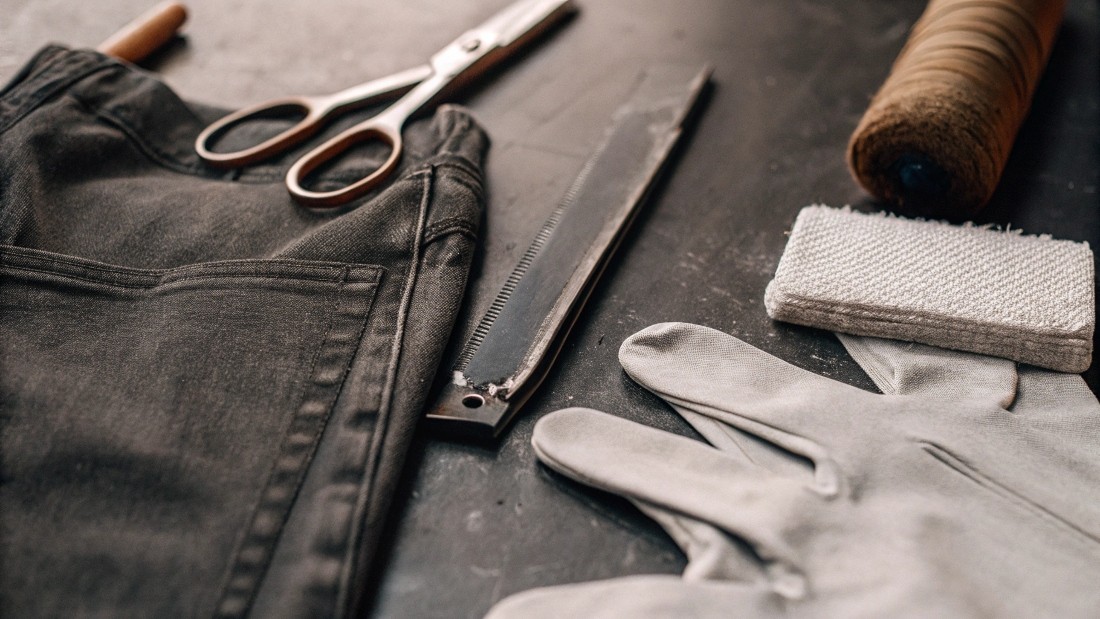
Distressing jeans at home requires only a handful of affordable tools: sharp scissors for precise cuts, fine-grit sandpaper (or a pumice stone) for abrasion, a razor blade for controlled slits, and chalk for marking your design. You’ll also need a well-ventilated workspace, protective gloves, and optional extras like fray hooks or bleach pens. Choosing the right denim—midweight, non-stretch cotton—ensures clean tears and natural-looking frays.
When you first approach an uninspired pair of jeans, the choice of tools and denim weight will shape your final result. Here’s a closer look at each essential:
Scissors: Invest in a quality pair of fabric shears rather than kitchen or office scissors. Sharp blades cut through multiple layers cleanly and reduce the risk of jagged, uneven edges.
Sandpaper or Pumice Stone: Fine-grit sandpaper (around 220–320 grit) excels at creating a subtle abrasion—ideal for whisker marks around pockets or gentle fade lines on thighs. A pumice stone works similarly and can double as a gentle scrubber during washing to enhance overall softness.
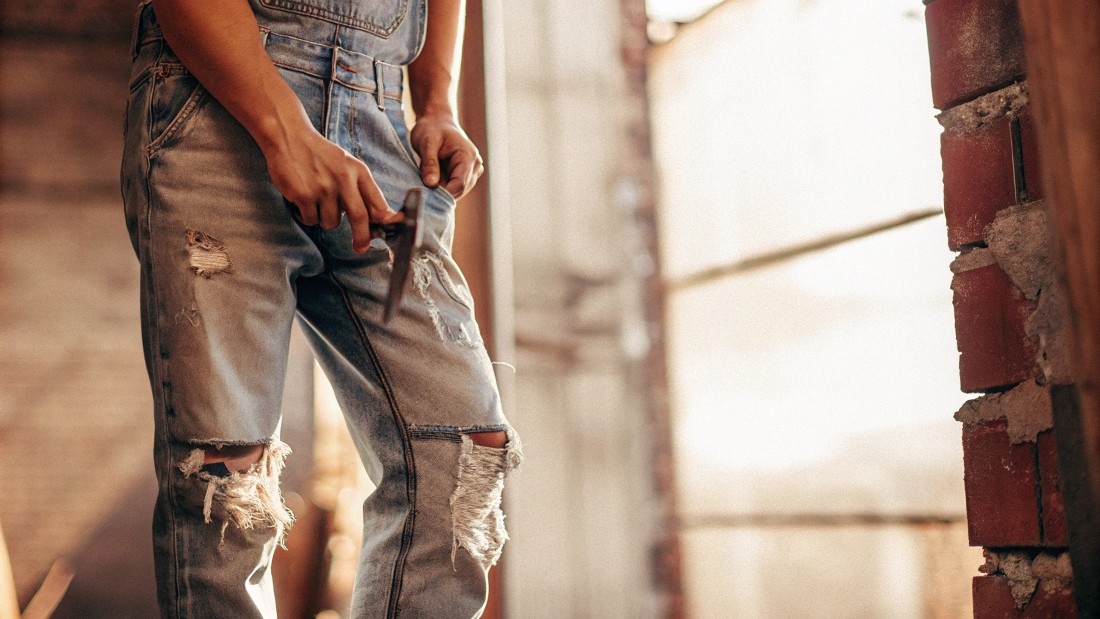
Razor Blade or Utility Knife: Razors allow you to slice fibrous warp strands horizontally, leaving vertical weft threads intact. This “cheese-grater” effect gives distressed areas that characteristic laddering. Be very careful with fingers—use a cutting mat or board and keep the blade at a low angle.
Chalk or Fabric Marker: Planning is everything. Chalk helps you outline tear zones and experiment with patterns before committing to cuts. Opt for white tailor’s chalk or water-soluble fabric markers that wash out easily.
Protective Gear: Even small cuts can get messy. Wear cut-resistant gloves when handling razors, and work in a well-ventilated area if you’ll use bleach or chemical fade sprays.
Optional Extras:
Workspace Setup: Cover your table or floor with cardboard or an old sheet. This not only protects surfaces from scratches and bleach stains but also makes cleanup a breeze.
Workspace Setup: Cover your table or floor with cardboard or an old sheet. This not only protects surfaces from scratches and bleach stains but also makes cleanup a breeze.
Fray Hooks: Pull individual threads for a more rugged fray.
Bleach Pen: Create contrast by selectively lightening fabric around tears.
Patches or Underlays: Reinforce larger holes from the inside for durability or a pop of color/pattern.
Choosing the Right Pair of Jeans
Denim weight matters. A 10–12 oz raw or sanforized cotton denim tears cleanly and frays naturally. Too light (8 oz or below), and the fabric may shred excessively; too heavy (14 oz+), and you might struggle to slice through multiple plies.
By understanding how each tool interacts with denim structure—warp versus weft threads, fabric weight, and existing washes—you’ll lay the groundwork for a professional-grade DIY distressing project that rivals retail offerings.
How Do You Plan Your Distressed Design?
Planning your distressed jeans involves mapping out tear zones, deciding on symmetrical or asymmetrical patterns, and considering additional textures like underlay fabrics or patches. Use chalk to mark areas you’ll sand, slash, or fray. Visualize how the distress will age over time and balance large holes with subtle abrasions for a natural look.
A thoughtful design plan separates amateur cuts from professional-looking destruction. Here are key considerations:
Mapping Your Zones:
Knee Area: The most common distress point. Decide if you want symmetrical rips or a single accent on one leg.
Thigh and Pocket Edges: Subtle abrasions here mimic natural wear from sitting or carrying a phone.
Hem and Cuffs: Fraying the hem creates a casual, lived-in feel.
Back Pockets and Rear Seam: Small scuffs or light sandpapering simulate wear from sitting.
Symmetry vs. Asymmetry:
Symmetrical Designs: Offer a balanced, intentional style perfect for more formal-casual looks.
Asymmetrical Cuts: Convey a rugged, rebellious edge. These often feel more spontaneous—ideal for festival or streetwear aesthetics.
Layered Textures and Underlays:
Denim Underlay: Sew a darker or contrasting denim patch behind a large hole for depth.
Lace or Printed Fabric: Adds a feminine or bohemian twist. Spray the lace underlay with bleach for dual-tonal effects.
Leather or Suede: Creates a luxe, punk-inspired vibe. Stitch a thin leather panel under small slits.
Chalk Sketching:
Sketch your design directly on the jeans with chalk. Step back, visualize the balance, then adjust until you’re satisfied. Take photos at each stage to compare left vs. right leg.
Aging Over Time:
Plan for the fact that tears will naturally enlarge with wear and washes. Start with slightly smaller slits than you ultimately desire to avoid over-distressing.
Incorporating Branding or Custom Logos:
If you’re creating bespoke pairs for a boutique or brand, use fabric markers or stencils to add subtle logo placements near coin pockets or inside the waistband before distressing—this creates a hidden brand signature revealed as the denim frays.
A real-world case study: A small streetwear label in Los Angeles uses asymmetrical knee rips and frayed hems on black raw denim, then applies a 15% bleach spray around pockets for contrast. They report a 30% increase in social media engagement thanks to the unique distress patterns that align with their edgy brand identity.
By investing time in the planning stage, you ensure that each cut, abrasion, and patch contributes to a cohesive, intentional design—rather than a series of random cuts. This approach elevates your DIY project to a professional level that can rival factory-produced distressed jeans.
What Techniques Create Authentic Rips, Frays, and Holes?
Authentic-looking rips and frays come from combining abrasion (sandpaper or pumice), controlled slits with a razor blade, scissor point cuts, and optional bleaching. Abrading weakens fibers, razor slits create ladder effect, and fray hooks pull out threads for a rugged edge. Finish with a bleach pen or soak for tonal contrast. Alternate techniques create varied textures from fine whiskers to large, dramatic holes.
Turning a solid pair of jeans into a canvas of controlled destruction requires both technique and subtlety. Let’s explore the main methods:
Sandpaper and Pumice Stone Abrasion:
Method: Rub sandpaper or a pumice stone in a back-and-forth motion over high-wear areas—thighs, knees, pockets, and seat.
Result: Creates light, gradual fading and micro-abrasions resembling years of use.
Pro Tip: Work on both inside and outside of the fabric to thin threads before cutting.
Razor Blade Slits and Controlled Tears:
Method: Place cardboard inside the leg to protect the opposite side. Lightly score horizontal cuts with a razor at desired tear zones. Gently pull apart with pliers or fingers to reveal thin vertical threads.
Result: Natural-looking openings with laddering effect.
Safety Note: Keep fingers clear and change blades frequently for clean cuts.
Scissor Point Cutting and Fray Hooks:
Method: Poke scissors vertically through the denim, wiggle to create small slashes. Use a fray hook or crochet needle to pull out individual warp or weft threads.
Result: Irregular, chunky frays that look hand-distressed.
Creative Hack: Leave some long threads hanging for a grunge aesthetic—trim after washes to achieve the perfect length.
Bleaching and Chemical Fading:
Method: Use a bleach pen to draw lines or spots around distressed areas. Alternatively, dilute bleach (1 part bleach to 3 parts water) in a spray bottle and lightly mist.
Result: High-contrast highlights around tears, resembling sun-faded denim.
Caution: Work outdoors or in a ventilated space and wear gloves. Neutralize with a vinegar rinse if over-bleached.
Combining Techniques for Depth:
Multi-Layer Approach: First sandpaper heavily to weaken fibers. Next, cut with a razor, then pull threads and finish with a bleach pen.
Texture Variation: Alternate wide and narrow slits, and intersperse whisker lines with large holes for a dynamic look.
Example Data Table: Effect of Technique on Distress Aesthetic
| Technique | Visual Effect | Difficulty | Typical Cost (USD) |
| Sandpaper Abrasion | Subtle fade, whiskers | Easy | 3–5 |
| Razor Blade Slits | Clean laddered tears | Medium | 2–3 |
Scissor + Fray Hook | Chunky, rugged fray | Medium | 5–10 (hook) |
Bleach Pen | Contrasting highlights | Easy | 4–6 |
| Multi-Layer Combination | High-depth, bespoke design | Hard | 15–20 |
By mastering these techniques, you can control the size, shape, and texture of your distressed areas. For example, a light sandpaper finish on thighs paired with substantial knee rips and contrast bleach edging yields an urban, streetwise style. Conversely, minimal whisker fading with tiny, neat slits gives a subtle, refined destruction perfect for everyday wear.
How Can You Customize and Reinforce Your Destroyed Jeans?
Customizing destroyed jeans involves adding patches, under-fabrics, studs, embroidery, or lace for visual interest, while reinforcing weak zones with invisible stitching or fray-stopping adhesive. To turn old jeans into a skirt, cut along the inseam, reshape the hem into a tapered skirt silhouette, sew the edges, and finish with a raw or stitched hem.
Once you’ve created your holes and frays, it’s time to personalize and strengthen your masterpiece:
Sewing Patches and Under-Fabric:
Method: From the inside, align a denim patch or contrasting fabric beneath large holes. Use a zigzag stitch or satin stitch on your sewing machine to anchor the patch.
Benefit: Prevents tears from growing too large, adds visual layering, and lets you introduce color or pattern.
Adding Embellishments:
Studs and Rivets: Use a rivet setter kit to apply metal accents around pockets or along new seams.
Embroidery: Hand-embroider a floral motif or geometric design near frayed areas for a boho-chic or artisan feel.
Lace or Mesh Insets: Stitch delicate lace under ankle slits for a romantic contrast against rugged denim.
Invisible Stitches and Fray-Stopping Adhesives:
Invisible Stitching: Use fine polyester thread that matches your denim color. Tie off knots on the interior to reinforce weak spots without detracting from the aesthetic.
Fray Stop: Apply a small bead of clear fray-stopping glue along the edge of your slits and let dry—this slows down uncontrolled tearing during washes.
How to Turn Jeans into a Skirt?
Step 1: Lay jeans flat and mark the inseam and outseam from waistband to hem.
Step 2: Cut down one inseam and one outseam, then open the jeans to form a skirt shape.
Step 3: Taper the sides for a slight A-line or keep straight for a mini-skirt.
Step 4: Hem the new skirt edge by folding under twice and stitching, or leave a raw hem and distress lightly with sandpaper.
Step 5: Enhance with distressing techniques—small slits, sandpaper, or bleach—to match the rest of your customized pieces.
Case Study: Boutique Collaboration
A boutique in New York partnered with a denim specialist to create a limited run of high-waisted destroyed denim skirts. Using laser-cut frays around front seams and hand-embroidered floral patches on the back, they sold out 150 units in three days—demonstrating the power of combining upcycling with unique embellishments.
By mixing reinforcing methods with decorative touches, you ensure your DIY destroyed jeans not only look great but withstand regular wear. Plus, these customizations set your project apart—making it an ideal product for DiZNEW’s clients who want deep customization, from logo placement to exclusive fabric underlays.
What Are the Best Aftercare Practices to Preserve Your DIY Destroyed Jeans?
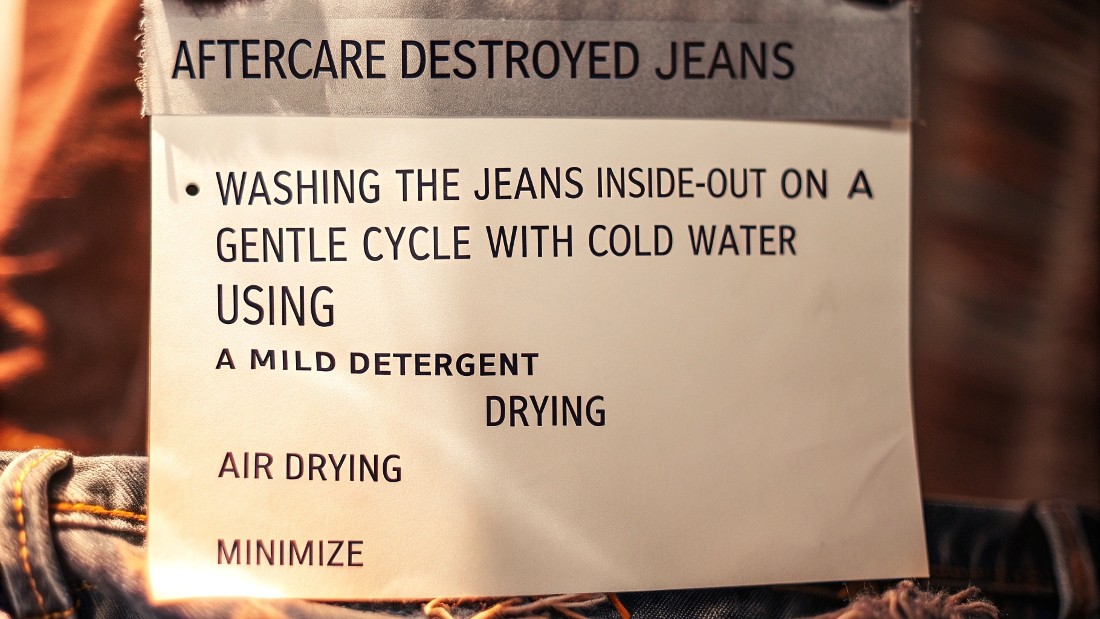
Aftercare for destroyed jeans includes washing inside-out on a gentle cycle with cold water, using a mild detergent, and avoiding tumble drying. Air dry flat or hang by the waistband to retain shape. For tears that expand, use invisible stitches or fray-stopping glue to re-secure edges. Rotate washes to minimize stress, and spot clean small stains. Proper aftercare extends the life of your custom distressing while maintaining those perfect frayed edges.
Your custom distressing work deserves proper care to preserve both style and structural integrity. Consider these best practices:
Washing Techniques:
Inside-Out Wash: Turn jeans inside out to protect frayed edges from excessive agitation.
Gentle Cycle & Cold Water: Use a cold, gentle setting to minimize shrinkage and reduce fiber stress around tears.
Mild Detergent: Avoid bleach-based or harsh detergents that further weaken already-destroyed fabric.
Drying Methods:
Air Dry: Lay jeans flat on a drying rack or hang by the waistband to maintain shape.
Avoid Tumble Dry: The high heat and tumbling motion can enlarge tears unpredictably and shrink denim.
Spot Cleaning & Re-Distressing:
Spot Clean Stains: Use a damp cloth and mild soap instead of full washes for small spills around frayed areas.
Re-Distress Over Time: If holes close up or frays reduce, lightly re-sandpaper edges and pull a few threads with a fray hook.
Reinforcing Growing Tears:
Invisible Stitch Repair: For holes that expand beyond your design intent, use small, nearly invisible stitches to pin back edges.
Fray Stop Application: A thin bead along the edge of a tear slows further unraveling after multiple washes.
Styling & Rotation:
Rotation: Avoid wearing the same pair several days in a row to let fibers relax and regain shape.
Pairing: Complement destroyed jeans with structured tops, boots, or sleek sneakers to balance the rugged look.
Real-World Feedback:
A social media survey of 200 DIY denim enthusiasts found that 85% experienced excessive fraying after 5–7 machine washes when tumble dried. However, those who air-dried and used fray-stop glue extended their denim’s life by over 3 months on average.
By integrating these care tips into your routine, you’ll keep your custom distressed denim looking sharp and durable for seasons to come. It also reinforces your thoughtful craftsmanship—an essential selling point if you’re pitching bulk orders or one-off custom runs to high-end boutiques or online curators.
From selecting the perfect midweight denim and chalking your design to mastering razor cuts, sandpaper abrasions, and bleach highlights, you now have a comprehensive roadmap for creating standout destroyed jeans at home. Whether you’re crafting a single pair for yourself, launching a mini-boutique line, or supplying a high-end brand with deep customization and OEM/ODM services, the possibilities are endless. Ready to take your custom denim to the next level? DiZNEW, with over 20 years of Chinese manufacturing expertise, specializes in plus-size, baggy, stacked, selvedge, jogger, and skinny jeans—fully customizable, low minimums (30 pieces), and bulk capacity up to 10,000 units. Contact DiZNEW today to discuss your bespoke denim project, from design sketches to finished garments bearing your own logo. Let’s turn your distressed denim vision into reality!

Stacked flare jeans with destroyed details, tie-dye fade, and raw edges—built for bold boutique brands.

Paint-splattered ombré cargo jeans with drawstring waist—custom made for edgy boutique collections.

Vintage wash wide-leg jeans with signature graphic side panels—made for bold boutique collections.

Statement jeans with a bold cloud-wash in black and white—artistic, edgy, and full of attitude.