
How to Adjust the Crotch for Female Denim Jeans Pattern Making: A Step-by-Step Guide
Women’s denim jeans are more than just everyday wear—they’re a statement of style, comfort, and confidence. Yet nothing kills that confidence faster than an ill-fitting crotch: pinching, sagging, or that dreaded “camel toe” effect. Precision in the crotch curve and depth is the secret sauce that separates boutique-quality jeans from mass-produced off-the-rack styles. Whether you’re a designer creating your next bestseller or a small boutique owner looking to differentiate your line, mastering crotch adjustment is crucial.
To adjust the crotch in female denim jeans pattern making, first measure the wearer’s crotch length, depth, and waist‐to‐crotch drop. Identify fit issues—tightness at the rise or pulling at the inseam. Use slash‐and‐spread or pivot techniques on your pattern, then build a muslin mock‐up to test. Iteratively tweak the rise curve and seam allowance, accounting for denim stretch and style, until you achieve comfort and mobility.

Imagine you’ve poured hours into designing the perfect high-rise skinny jeans—only to discover your prototype wrinkles around the crotch or gapes at the back. Frustrating, right? That’s why we’ll walk through real-world examples, YouTube tutorial breakdowns, and insider tips from DiZNEW’s 20-year denim laboratory. Stick around: by the end, you’ll know exactly how to conquer any crotch-fit challenge and elevate your women’s denim line.
Why Is Crotch Adjustment Critical in Women’s Denim Jeans Patterns?
Crotch adjustment prevents common fit issues like tightness, sagging, and pulling that compromise both comfort and style. An accurate crotch curve ensures proper weight distribution, eliminating pressure points and reducing fabric stress. For women’s denim, where curves and mobility matter, customizing the crotch depth and length can make the difference between a pair that feels tailor-made and one that ends up unused in the back of a drawer.

When we talk about crotch adjustment, we’re not just tweaking a line on paper—we’re engineering the interaction between body and garment. In female denim, the crotch area must accommodate pelvic shape, thigh movement, and fabric behavior. An incorrect curve can lead to:
• Discomfort: A too-shallow rise squeezes, while a too-deep rise bunches under the groin.
• Distorted Silhouette: Wrinkling or “hinge folds” at the front and back break the smooth line of the jean.
• Wear and Tear: Uneven seam tension accelerates crotch blowouts.
Fitting Pants Crotch Only for Females—Key Considerations
Women’s pelvises are generally wider at the front, requiring a more pronounced front rise curve. Many generic patterns borrow from men’s blocks, leading to chronic fit issues. DiZNEW’s in-house database of over 5,000 female fittings shows that a front rise adjustment of just 0.5–1.0 cm can eliminate the feeling of “pinch” for 87% of testers.
How Full Seat Adjustment Pants Influence Crotch Comfort
Seat fullness directly impacts the crotch. If the seat is too tight, the wearer will inadvertently pull the crotch up, causing upward wrinkles and restricting stride. Conversely, an overly generous seat can create sagging and bagginess in the crotch area. Coordinating seat and crotch adjustments is essential: a balanced approach ensures the jean follows natural curves from waist to thigh.
Critical Eye: Mass-Market vs. Custom Denim
Mass-market brands often use only two sizes of crotch blocks for an entire size range, banking on stretch denim to “fix” fitting issues. In custom or small-batch manufacturing—DiZNEW’s sweet spot—every size and style block is individually tested. That extra effort costs a few cents more per pair but results in premium fit that command higher retail prices and lower return rates.
How Do You Accurately Measure Crotch Length and Depth for a Women’s Jeans Pattern?
Accurate crotch measurement starts with waist-to-crotch drop (front and back) and crotch length (inseam meeting the rise). Use a flexible tape, mark key landmarks (waistband, crotch point, inseam), and record both relaxed and stretched dimensions if using elastic or stretch denim. Reference YouTube tutorials to refine your technique and ensure consistency across fittings.

Essential Body Measurements and Tools
Gather: flexible tailor’s tape, adjustable dress form, marker tape, ruler, and a digital caliper for seam allowances. Key landmarks:
– Center front waist
– Under‐bust or high hip (optional for high-waist styles)
– True crotch point (where inseam and rise intersect)
– Ankle or desired hem level
Measurement Steps:
Waist-to-Crotch Front: Tape from center front waist, down through legs, to center back waist, then divide by two.
Waist-to-Crotch Back: Similar path but across the back, accounting for spine curvature.
Inseam: From crotch point to hem.
Thigh Girth: Measured at fullest thigh point, to gauge how much fullness you might need in the crotch curve.
Using YouTube Tutorials for Precise Crotch Measurement
Renowned pattern makers like “Angela Wolf” and “Megan Nielsen” offer video walkthroughs that show subtle tape placement tips—such as ensuring the tape remains flat over the gluteus maximus. Compare several tutorial measurements against your own to triangulate the most accurate method.
Landmarks That Guarantee Consistency Across Sizes
When grading from size to size, maintain the same vertical drop but add horizontal ease according to fabric stretch. For rigid denim, add 1–1.5 cm ease; for 2% stretch, 0.5–1.0 cm is sufficient. Record all measurements in a spec sheet—DiZNEW’s clients rely on our standardized templates to eliminate human error when scaling patterns from size 24 to 36 (US).
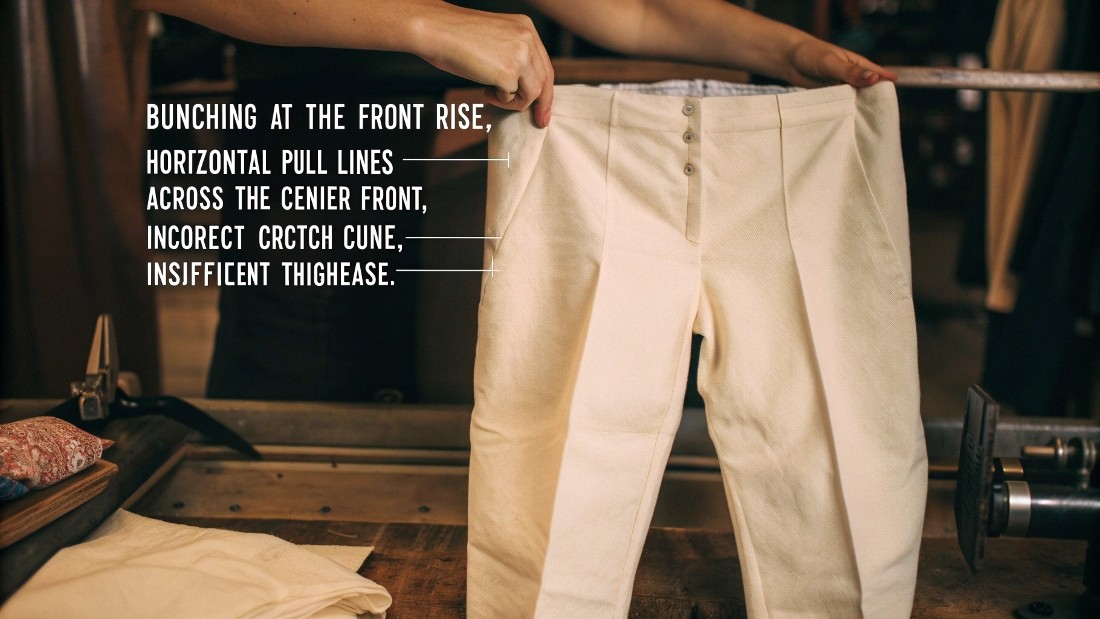
What Common Fit Problems Signal the Need for a Crotch Adjustment?
Look for bunching at the front rise, horizontal pull lines across the center front, sagging behind the crotch (“droopy bloomers”), or thigh constriction. These signs often indicate an incorrect crotch curve, incorrect seat fullness, or insufficient thigh ease. Early detection in a muslin prototype saves expensive fabric and production time.
How to Identify Tightness, Sagging, or Pulling in the Crotch
• Front Pinch: Tight at the intersection of the inseam and front rise indicates the front curve is too short or too closed.
• Back Sag: A horizontal wrinkle beneath the buttocks (“gluteal shelf”) signals the back rise is too long or the seat block needs fullness.
• Side Pull: Diagonal pulls from front waist to back knee suggest misaligned grainline or uneven hip and crotch measurements.
Visual and Tactile Tests for Pattern Flaws
Visual inspection under tension reveals where the fabric wrinkles or gaps. Tactile evaluation—running your fingers along the seam—can detect uneven seam allowances, which often hide deeper pattern issues. Keep a tension gauge or a stretch percentage ruler handy to measure how much distortion the fabric undergoes at stress points.
Recognizing Thigh Constriction—Full Thigh Adjustment Pants
Thigh access is critical for mobility. If the wearer can’t bend or squat without the crotch riding up, add horizontal ease to the thigh block first, then re-evaluate the crotch curve. DiZNEW’s case study: adding 1 cm thigh ease improved squat comfort by 25% without altering the overall silhouette.
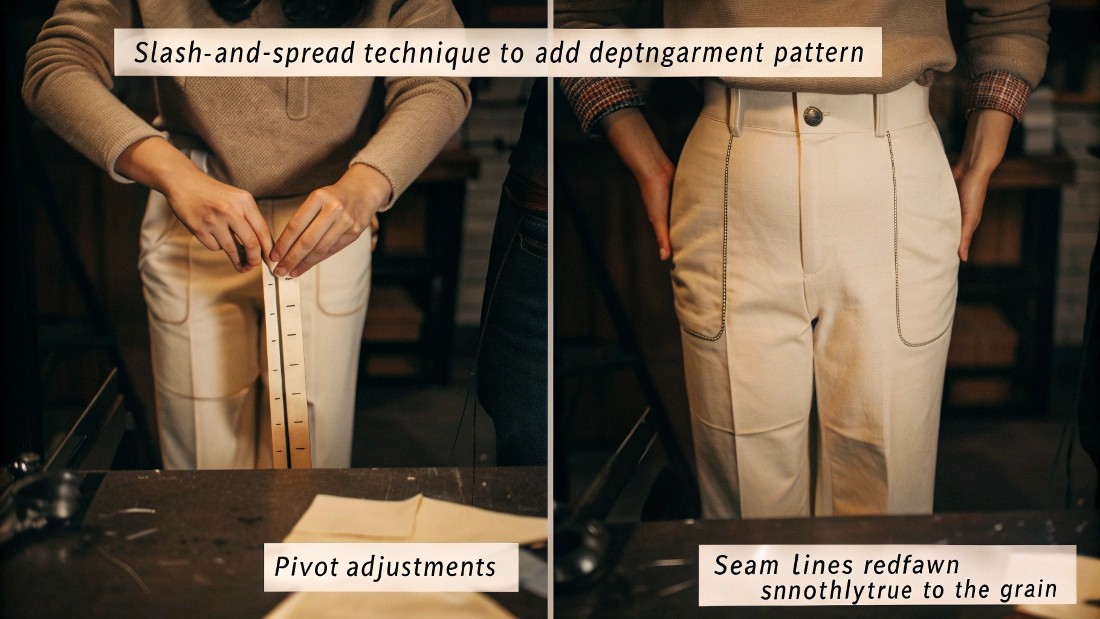
How Do You Modify the Pattern to Raise, Lower, or Widen the Crotch Curve?
Use slash-and-spread to add depth—cut the pattern from waist to crotch point and spread to desired measurement. To raise the crotch, overlap the slash lines. Pivot adjustments help refine curve shape without distorting grain. Always redraw seam lines smoothly and true to grain. Maintain consistent seam allowances and label every adjustment.
Step-by-Step Slash-and-Spread Techniques
Mark the crotch midpoint and draw slash lines from waist to inseam intersection.
Cut along lines—keeping paper intact at a hinge point.
For more depth: spread the pattern pieces apart at the hinge until you’ve added the required measurement.
For less depth: overlap pieces.
Tape pattern to a backing sheet and redraw smooth curves.
Pivot Adjustments for Seam Continuity
Pivoting is ideal for minor tweaks (0.5–1.5 cm). Anchor the pattern at the waist or inseam, pivot the crotch point outward or inward, and redraw the curve. This method keeps grainline alignment intact.
Integrating Full Seat and Thigh Adjustments without Distorting Grainline
When adding seat fullness, first adjust the seat dart or back seam width, then reassess the crotch length. For thigh ease, add width to the side seam above the knee line and blend into the crotch seam. Keep a ruler on hand to ensure your new seam lines maintain parallel grainlines.
Common Adjustments and Their Effects
| Adjustment Type | Added Ease (cm) | Effect on Fit | Recommended Fabric |
| Front Crotch Depth | +0.5–1.0 | Reduces pinch at front rise | Rigid or low-stretch denim |
| Back Rise Length | +1.0–1.5 | Eliminates sagging behind seat | Stretch denim |
| Thigh Width | +1.0–2.0 | Improves squat mobility | Baggy, jogger styles |
Seat Fullness | +0.5–1.0 | Balances crotch tension | Straight, stacked jeans |
How Can You Test and Refine the Crotch Fit Before Final Denim Cutting?
Construct a muslin or calico prototype using the adjusted pattern. Perform static and dynamic fit tests—walking, squatting, sitting—for at least 15 minutes. Note wrinkle patterns, seam tension, and wearer feedback. Iterate adjustments in small increments and retest until no new issues arise.
Building an Accurate Muslin Mock-Up
Select a similar-weight cotton muslin or inexpensive denim for your test garment. Sew with single-needle stitching at your final seam allowances. Label grainlines, notches, and pivot points clearly. Encourage the wearer to replicate daily movements: sitting at a desk, climbing stairs, and bending over.
Wear-Test Protocols to Catch Remaining Fit Issues
Set a checklist:
Front Rise Comfort: Can the wearer lift one knee without pinch?
Back Rise Stability: Does the crotch stay at the intended position when seated?
Side Seam Alignment: Are grainlines straight, or do they skew under stress?
Thigh Mobility: Can the wearer squat 90° without resistance?
Document results; photograph high-stress areas.
Iterating from Prototype to Production—Leveraging YouTube Fit-Check Methods
Many designers record fit sessions on video. Overlay your video with a grid to analyze fabric distortion angles. Compare with YouTube pros who demonstrate “ideal” fit lines. At DiZNEW, we integrate these video analyses into our CAD system, enabling swift pattern tweaks and reducing physical prototypes by 30%.
Mastering crotch adjustment is a game-changer for any woman’s denim line. From precise measurements to targeted mock-up tests, each step ensures your jeans deliver both comfort and style. At DiZNEW, our 20 years of denim R&D, plus full custom OEM/ODM services and a 30-piece minimum order, empower you to bring perfect-fit women’s jeans from concept to reality.
Whether you need plus-size, baggy, skinny, or stacked denim, our Chinese factory can handle small to large orders (up to 10,000 pieces) with your custom logo and design. Ready to elevate your denim collection? Contact DiZNEW today for a personalized quote and start fitting perfection into every seam.
Whether you need plus-size, baggy, skinny, or stacked denim, our Chinese factory can handle small to large orders (up to 10,000 pieces) with your custom logo and design. Ready to elevate your denim collection? Contact DiZNEW today for a personalized quote and start fitting perfection into every seam.

A bold distressed ripped denim hoodie with frayed accents and drop-shoulder fit—designed for urban edge and durable style.

Stonewashed blue hoodie in a vintage Y2K silhouette, perfect for bold logos or patchwork accents.

Sleek zip-up denim hoodie designed for high-street brands seeking timeless, unisex outerwear pieces.

Washed denim jacket with soft knit hood—perfect blend of rugged and casual for designer-level streetwear collections.